


Sewing Pattern
Cutwork Jewellery Envelope
Gifts Jewellery


Cutwork gives stunning, intricate results but the concept is very simple – details of motifs are outlined in buttonhole stitch, then the enclosed areas of fabric are cut away. It is traditionally worked in white thread on white fabric but it can look equally effective when you use coloured fabrics and threads. This jewellery envelope features a simple floral design and scalloped edge. If you're new to hand embroidery, why not try one flower to begin with?


Essentials
- Medium weight cotton or linen, pale blue, 40cm x 60cm
- Embroidery thread, ivory, lemon, lime
- Crewel needle
- Embroidery hoop
- Pen, air-erasable, transfer
Dimensions List
- 19cm x 26cm
Stitch a jewellery envelope
1 Download the template pack by pressing the button above, then print the jewellery envelope motif. Mark a 28cm x 48cm rectangle in the centre of blue fabric with an erasable pen. Trace or photocopy the cutwork motif onto thin paper and draw over the lines with a transfer pen on the reverse. Position the motif at one short end of the rectangle and transfer the design using a hot iron. Trace the scalloped motif in the same way and transfer to the other end of the rectangle.
2 Place the fabric in an embroidery hoop with the flower motif in the centre. Using two strands of embroidery thread, sew a small running stitch just inside the design line, within the shape to be stitched. Use ivory thread for the petals, lemon for the flower centres and lime for the leaves.
3 Work a close, neat buttonhole stitch all round the edge of each shape, covering the running stitches (see Buttonhole Stitch instructions below). When working around a curve, each stitch should still be at right angles to the line; this means that the stitches will splay out slightly but you should still try to work them as close together as possible. The top edge of the stitches (the edge with the rope-like appearance) should surround any areas that are to be cut out.
4 When all the embroidery is complete, remove the fabric from the hoop and press on the reverse. Then using small, sharp scissors, carefully cut out the background areas of the design. Start by piercing the fabric in the centre of the shape, snip towards one corner, then cut the fabric as close to the stitching as possible. Take care not to cut into the stitches.
5 To make the jewellery envelope, place the fabric face down and fold up the scalloped edge. Stitch the side seams with a 1.5cm seam allowance. For a neat finish on the inside of the pocket, turn under each raw edge on the seam and slip stitch in place. Narrow hem the two side edges on the flap, then press.
Buttonhole Stitch
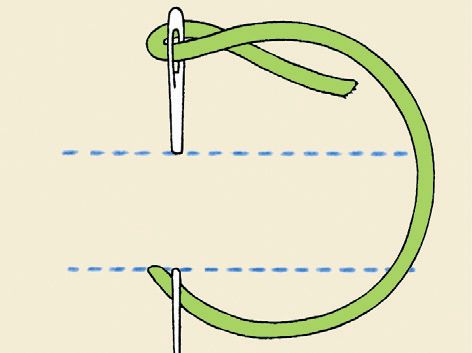
1 Bring the needle out at the line below. Insert at a point above and slightly to the right of where the needle entered the fabric, then bring out directly below. Keep the thread under the needle.
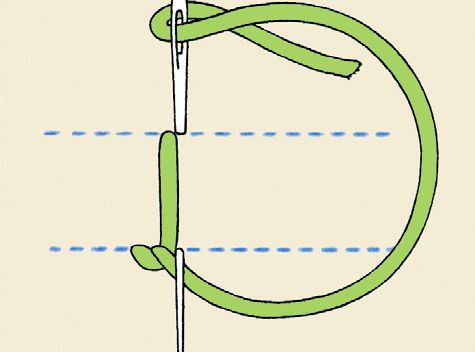
2 Pull the thread through to form a stitch. Insert the needle next to where it came it in the first step and bring out directly below, holding the thread under the needle.
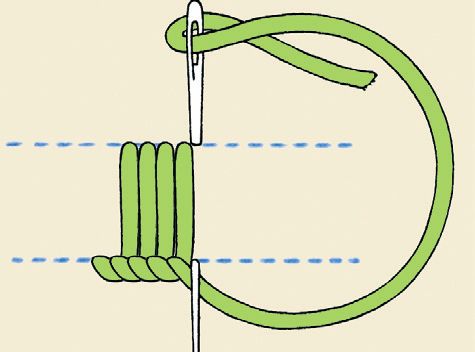
3 Continue working to fill the desired area. When stitching along the edge of a piece of fabric, the needle passes through the fabric only once on each stitch and the loops are formed along the edge.
Other Popular Makes...

Nigel the Dragon Toy
Children Toys
- Dimensions:
- XS-XL (8-16)
Make this majestic and colourful soft toy dragon, complete with felt spikes and magnificent turquoise wings. The fabric for this…

Photo Discs
Children Home makes Quick makes
- Dimensions:
- XS-XL (8-16)
Mark those magical milestones with our Photo Discs. Mark baby’s progress with the help of these fun circles from Carolyn Letten.…

Hair Clip Dolly
Dolls Home makes Quick makes
- Dimensions:
- XS-XL (8-16)
Organise bows, bands, barrettes and beyond with our Hair Clip Dolly. If your little one loves accessorising with pretty clips, you’ll…

Positive Pants
Accessories Decorations Home makes Quick makes
- Dimensions:
- XS-XL (8-16)
Chin up everyone, it’s time to pull on your Positive Pants. We’ve all been there, in need of some self-belief and a…

Ten in a bed toy
Home makes Quick makes Toys
- Dimensions:
- XS-XL (8-16)
Bring a beloved nursery rhyme to life with our Ten in a Bed Toy. Designed by Chloe Hailwood, this fabric…

Sleeping Kitty Cat
Home makes Quick makes Toys
- Dimensions:
- XS-XL (8-16)
Decorate your mantlepiece with our sunshine-basking Sleeping Kitty Cat. Cats just love laying in warm spots around the home and…


