Already a member? Click here to Login




Safety Notice: Handmade items made from this pattern may contain small parts or long cords that pose choking or strangulation risks. Not suitable for children under 3 years. Please see the full safety disclaimer at sewmag.co.uk/safety.
This loose-fitting tunic top is perfect for summer, made in your favourite quilting cotton. If you’d prefer a cami top, simply use the shorter cutting lines on the pattern to find the perfect hem line for you. You can customise your look further with a tie belt and pretty fabric corsage.
sew a summer tunic
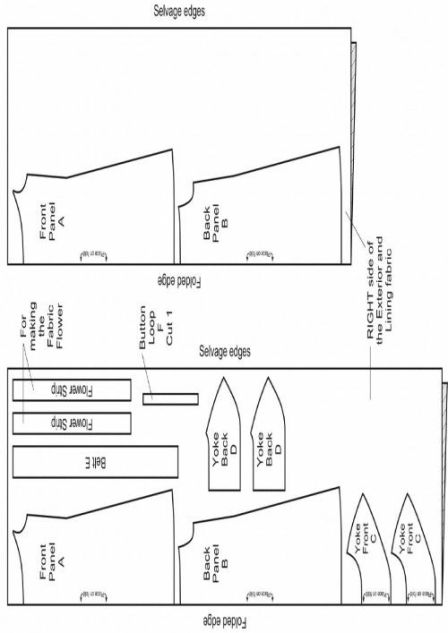
1 Download and print the pattern. Fold fabric in half lengthways with wrong sides together matching the selvedge edges. Use the entire length of the pattern pieces to make the tunic or if you are making the cami, fold back the front and back panel pieces at the cutting lines for the appropriate length. Cut out the pieces from fabric and lining using the cutting guide.
2 On both the main and lining front and back panels, finish the side raw edges by overlocking or zigzag stitching. Place the exterior front and back panels right sides together matching the side edges and pin them in place. Stitch down both sides and backstitch at each end. Press the seam allowances open. Repeat to attach the lining front and back panels together.
3 Place the exterior and lining panels right sides together matching the raw edges and the side seams. Pin the edges in place around both armhole openings. Starting at one of the top edges, stitch around the first armhole, stopping at the top edges on the other side. Repeat around the second armhole. Clip into the seam allowance around the curve on both armholes.
4 Pull the exterior panels away from the lining at the arm openings. Press the seam allowances all the way around the armhole seam towards the wrong side of the lining. Turn the exterior and lining right side out, keeping them separated. Working on the right side of the lining, sew a stitching line 6mm from the armhole seam, catching the seam allowance underneath. Be careful not to catch the exterior in your stitching. Straighten the lining around the curved edge as you go and backstitch at each end.
5 Push the lining down inside the tunic and press the finished seams flat. Match both front panels and both back panels together at the top edges and pin them in place. Machine tack just short of 1.3cm across each of the pinned edges to hold them in place. Starting on the right side of the exterior front panel, sew two lines of gathering stitches along the top edge between the two notches; one at 6mm and one at 1.3cm. Leave long thread tails on each end of both stitching lines. Do not back stitch. Set the panels aside.
6 Mark the placement for the button loops on the right exterior yoke back. Using the right yoke template as a guide, place it on the right side of the yoke back at the centre back edge. Using a chalk pencil, transfer the marks for the placement of the four button loops. Then place the left yoke template on the right side of the left main yoke back at the centre back edge. Transfer the marks for the placement of the four buttons.
7 Make the loops by folding the button loop piece in half lengthways, wrong sides together, and press a centre crease. Open up the loop. Fold the long raw edges in to meet the centre crease and press. Fold it in half again at the centre crease enclosing the raw edges and press. Pin the folded edges together. Edge stitch down the long folded edge. Using the button loop pattern piece as a guide, cut it into four equal pieces.
8 Fold the first button loop in half matching the short raw ends. Place it on the right side of the right exterior yoke back, below the top mark on the centre back edge. Flip the end of the loop that is on top, over so the two ends lie side by side. Pin in place. Repeat to pin the other button loops in place. Then machine tack a 6mm seam across the raw ends of the loops.
9 Transfer the dots from the yoke front and back pattern pieces onto the right side of the main fabric and lining pieces. Place the first main yoke back and front right sides together matching the shoulder edges and pin. Stitch across the matched edges. Press the seam allowance open. Repeat to attach the second yoke back to the other shoulder on the yoke front. Repeat to attach the lining yoke panels together.
10 Sew a 1.3cm stay stitching line completely around the raw edges on both the main and lining yokes. Place them right sides together, matching the shoulder seams and pin. Starting 1.3cm from the bottom of the centre back edge, stitch a 1.3cm seam up the back edge, stopping the same distance from the top edge.
11 Keep your needle in the down position, pivot and continue stitching around the top edges to the yoke front. Continue around to the other yoke back, stopping 1.3cm from the centre back edge. Pivot and stitch down the centre back edges, stopping 1.3cm from the bottom edge. Trim the two back corners and clip into the seam allowance around the curved top edge.
12 Pull the exterior yoke away from the lining at the neck opening. Press the seam allowance all the way around the top seam towards the wrong side of the lining. Then turn the yoke right side out using a turning tool to push out the top back corners. Press the centre back edges flat including the 1.3cm left unstitched at the bottom of each edge.
13 Keep the exterior and lining separated. Working on the right side of the lining, starting around 5cm in from the finished centre back, sew a stitching line 6mm from the top seam, catching the seam allowances underneath. (Be careful not to catch the exterior yoke in your stitching.) Straighten the lining around the curved edge as you go and backstitch at each end.
14 Place the bottom edge of the exterior yoke front and the top edge of the exterior front panel right sides together matching the notches, and pin them in place. Pull the bobbin threads on each end of the stitching lines at the same time, slightly gathering the top of the front panel to fit between the notches on the yoke front.

 Sign in with Facebook
 Sign in with Google