Already a member? Click here to Login

Safety Notice: Handmade items made from this pattern may contain small parts or long cords that pose choking or strangulation risks. Not suitable for children under 3 years. Please see the full safety disclaimer at sewmag.co.uk/safety.
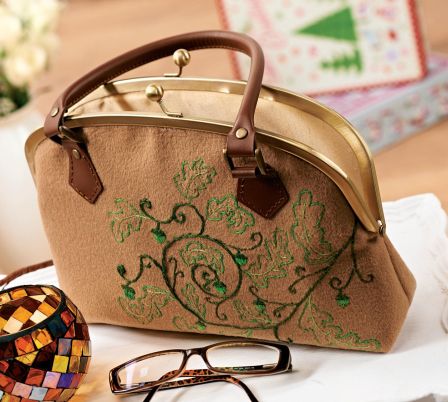
This classic little structured bag is made from luxurious wool coating and uses smart leather handles and a sturdy frame to give the project a retro feel. Meanwhile, an embroidered woodland motif makes this an elegant accessory for autumn days, that can be customised to your delight.
Stitch a bag
Carefully iron the wool coating fabric and secure it into an embroidery hoop. Locate the oak branch motif on page 85 and transfer it onto the fabric. Carefully stitch the design into place using embroidery threads, and remove the fabric from the hoop.
Create a pattern to use with your chosen purse frame. To do this, lay the frame on a piece of paper and trace around the outside, marking the bottom of the hinges on either side. Draw the shape you’d like your finished bag to be, ensuring the sides of it are wider than the purse frame and adding a 1cm seam allowance around the entire shape (including the purse frame outline).
Place a corner of the frame onto a corner of the pattern, and turn the frame so that the side of it lines up with the edge of the pattern. Mark the pattern 1.5cm in from the bottom of the hinge. Repeat on the other side.
Using the pattern as a guide, cut two pieces each from the wool, lining fabric, and the sew-in interfacing. Mark the lining and interfacing in the same place as for the pattern, 1.5cm from the bottom of the hinge on the bag sides.
Sandwich the wool fabric pieces (with right sides facing) between the two pieces of interfacing and pin. Sew together, starting at one of the hinge markings, working down one side, along the bottom and up the other edge to the second hinge marking.
To make a flat base, flatten one corner of the bag, to form a triangle shape, so that the side one meets the seam running along the base of the bag. Pin and sew a perpendicular seam 4cm from the tip of the triangle, then trim. Repeat on the opposite side, then turn the bag right sides out.
With right sides facing, sew the sides of the lining together, as in step 5, starting at the hinge mark and working downwards, leaving a large gap along the bottom. Using the same technique as in step 6, create a flat base by sewing perpendicular seams, this time 5cm from the tips of the corner triangles. Slip the bag into the lining with right sides facing outwards. The right sides of the bag and the lining should be touching.
Sew the top of the bag. Pin the lining to the wool fabric along the top and sides, and machine stitch from the point at which the seam starts on the lining, along and across to where it starts on the opposite side. Repeat on the other flap. Slip the bag through the open bottom of the lining, and tuck the lining into the bag.

 Sign in with Facebook
 Sign in with Google