Already a member? Click here to Login

Safety Notice: Handmade items made from this pattern may contain small parts or long cords that pose choking or strangulation risks. Not suitable for children under 3 years. Please see the full safety disclaimer at sewmag.co.uk/safety.
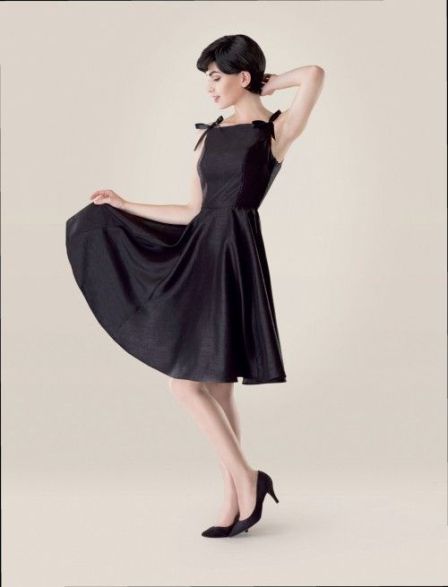
Audrey Hepburn and the little black dress go hand in hand. This design, created by Dolin Bliss O’Shea, was inspired by the frock Audrey wore in the classic movie Sabrina and epitomises one of the most popular silhouettes of the 1950s. It has a fitted bodice with a full skirt that shows off a narrow waist. Classic yet elegant in style, much like Audrey herself, it features princess seams, a fully lined bodice and bow details at the straps. Make up in silk dupion, shantung, taffeta, or duchess satin.
Stitch a Sabrina dress
1 Download and print the pattern, piece together then trace the pattern pieces and cut out. Lay them onto fabric and cut out as shown in the cutting diagrams. Transfer all pattern markings.
2 Stay stitch at the neckline and armholes of the centre front and centre back pieces, 1.2cm from the raw edge. Stay stitch the armholes of the side front and side back pieces. Repeat for the lining.
3 Fold the strap pieces in half lengthways, aligning the long raw edges, right sides together, and pin. Sew the long edges together using a 6mm seam allowance, then turn out through one of the open ends and press.
4 Join the centre front and side front pieces together to create princess seams. Repeat on the front lining pieces. Join the back, then back lining pieces in the same way; the back pieces don’t have any ease added to the princess seam.
5 With the front bodice right side up, align the strap ends along the top edge. Place the seamed side of the strap just inside the notch, and pin in place. Tack the straps to the front bodice, 1.2cm from the edge, then align the opposite strap end along the top edge of the back bodice and repeat for the other side. The two bodice pieces are joined by the two strap pieces. Slip it over your head and check that the strap length is correct, making adjustments if necessary.
6 Fold over and press the bottom edges of the lining 1.6cm to the wrong side, then unfold, leaving a pressed crease. With the wrong side of the front lining facing up, fold over and press 2.5cm to the wrong side on the right-hand side seam of the piece (this will be the left side seam on the finished garment).
7 With the wrong side of the back lining facing up, fold over and press 2cm at the left-hand side of the piece (left side seam) to the wrong side. Unfold the pressed edges of the lining, leaving a crease.
8 Align the front bodice with the front lining along the armholes and the top raw edges, right sides together, with the straps sandwiched between, and pin. Sew together along the armholes and top edge, making sure not to catch the straps in the armhole stitching.
9 The side seams are left unsewn at this time. Grade the seam allowances, trim the corners, and clip the curves. Press the seam allowance along the top edge, towards the lining. Understitch the top edge only between the straps. Turn out and press flat along the armhole and top edge seams. Repeat with the back bodice and back lining, making sure the straps aren’t twisted.
10 Flip the linings up at the side seams, so that the bottom edges of the linings are positioned above the armholes. With the wrong side of the front pieces facing up and waist edge closest to you, right sides together, align the raw edges of the lining, front, and back bodice pieces along the right-hand side seam raw edges, and pin. Make sure that the armhole seams are matched up, then sew the entire side seam together and press the seam open. Fold the lining to the inside of the bodice and press flat along the armhole seam. Leave the left side seam unsewn at this point.
11 Align one centre skirt piece with one side skirt piece at the long raw edges, right sides together, matching up the single notches, and pin. Sew together, press the seam open, and finish the raw edges. Repeat on the opposite side of the centre skirt with another side skirt piece. Repeat with the remaining skirt pieces.
12 Align both joined skirt panels along the side seam raw edges, right sides together. With the bottom edge closest to you, pin together the righthand side seam only. Sew together, press open, and finish the raw edges in your preferred method.

 Sign in with Facebook
 Sign in with Google