Already a member? Click here to Login

Safety Notice: Handmade items made from this pattern may contain small parts or long cords that pose choking or strangulation risks. Not suitable for children under 3 years. Please see the full safety disclaimer at sewmag.co.uk/safety.
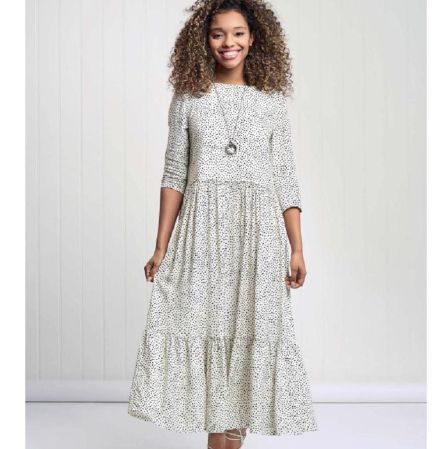
Do you have your heart set on stitching a suits-all seasonless pattern? Well, this spotted midi dress by Posner and Posner is just the thing for you! With its soft-as-butter fabric, flattering three-quarter length sleeves and romantic three-tiered trapeze skirt, it really is the epitome of effortless chic. It’s also the ultimate masterclass in stitching buttonholes, inserting sleeves and most importantly for the skirt, cracking gathering stitch.
Download the pattern from sewmag.co.uk, then print and follow the cutting guide. With right sides together, pin and sew darts in the front bodice and the front bodice lining. Press the darts down towards the bottom of the bodice. Apply the fusible interfacing strips to the centre-back bodice up to the facing line on the wrong side of the fabric. Press the centre-back facing to the wrong side along the fold line. Turn under 1cm, along the raw edge of the facing, and stitch.
Pin the bodice front and bodice back, right sides together at the shoulder, and sew. Trim the seam allowance and press open. Do the same for the bodice lining. With wrong sides together, pin the lining to the bodice at the neckline. Line up the notches and shoulder seams. Tuck the centre-back edge of the lining under the facing and pin in place. Stitch the bodice and the lining together around the neckline, close to the raw edge, but avoid sewing over the facing. Apply fusible interfacing to the wrong side of the front and back neck facings. Pin the facings together at the shoulder and sew. Trim and press the seams open. Neaten the outer edge of the facing using an overlocker, or by turning under a very narrow hem.
Pin the facing to the bodice neckline, matching the notches, shoulder seams and centre front. At the centre-back, unfold the back facing and bend it back on itself to reveal the wrong side. Pin the neck facing over the top of the turned-back centreback facing. Stitch around the neckline taking a 1cm seam. Clip the curved edge and trim the seam. Understitch round the neckline facing. Fold the neck facing to the wrong side and unfold the centre-back facing so it is right side out. Press the edge.
Make the buttonholes down the centre-back. Overlap the centre-back and sew the buttons in the correct position. Stitch across the bottom of the centre-back facing at the waist edge, close to the edge, to secure in position. Pin the bodice side seams right sides together and sew, then trim and press the seam open. Repeat for the bodice lining. Pin the lining and the bodice together around the armholes, making sure that the shoulder seams and side seams are lined up and at the bottom edge. Stitch in place, close to the raw edge and within the seam allowance.
Pin the sleeves right sides together at the underarm seam and sew. Neaten the edges with an overlocker or zig zag stitch and press the seam towards the back sleeve. Turn up and press a 2cm hem at the bottom of the sleeve. Fold the raw edge under to meet the pressed fold, then stitch. Sew two rows of gathering stitches between the notches at the top of the sleeve. Insert the sleeves, matching the centre notch to the shoulder seam, the underarm sleeve seam to the bodice side seam, with the back and front notches lined up. Ease the gathers to fit the sleeve into the armhole, then sew in place. Remove the gathering stitches and neaten the edge using an overlocker or zig zag stitch. Press the seam towards the sleeve.

 Sign in with Facebook
 Sign in with Google