Already a member? Click here to Login

Safety Notice: Handmade items made from this pattern may contain small parts or long cords that pose choking or strangulation risks. Not suitable for children under 3 years. Please see the full safety disclaimer at sewmag.co.uk/safety.
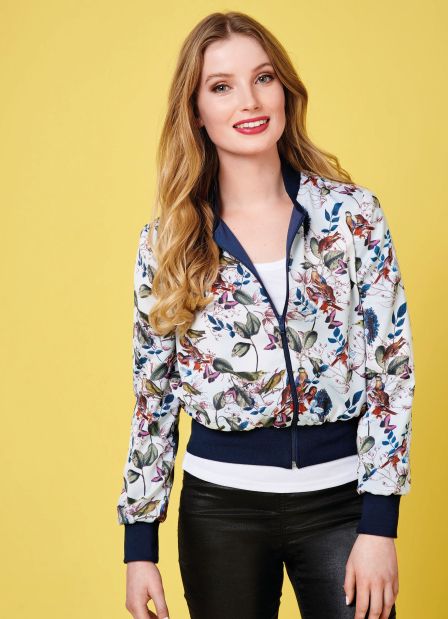
Did we hear someone say biker glam? Made in a gorgeous floral satin, this super stylish jacket by Amanda Walker is sure to wow. Use a bold print for statement appeal and build your skills by finishing the cuffs with a contrasting ribbed fabric.
1 Download and print the template. Cut out all of the pieces as described in the cutting guide. Position the pockets on the side edges of both the front and back jacket pieces as indicated. With right sides together, pin then stitch in place. Fold the pockets out from the side seams and press.
2 Lay the front pieces of the jacket on top of the back piece, right sides facing. Match the shoulder edges together, pin, stitch, and press the seams open. Repeat for the lining pieces. Align the side seams and the pockets on the front and back side edges together and stitch. Press the seams towards the front jacket. Match and stitch the side seams of the lining together.
3 Adjust the stitch length to number five and sew a row of gathering stitches around the head of the sleeves, starting from the front notch and finishing at the back notches. Match, pin and stitch the underarm sleeve seams together, right sides facing, and press the seams open. Pull the gathering threads up slightly and then place the sleeves, matching the notches into the armholes of the jacket. Align the side seams and the underarm seam of the sleeves together. When happy with the position, pin and stitch the sleeves in place. Make the sleeve linings in the same way and sew into the body of the jacket lining.
4 With right sides together, fold the waistband in half lengthways, pin, then stitch the ends together. Turn the band to the right side, mark the centre with a pin, then mark the quarter points in the same way. Match the raw edges of the waistband and the base of the jacket together. The sewn ends of the waistband should be positioned 1.5cm away from the centre front edges, the quarter points match the side seams and the centre to the centre back of the jacket base. Pin these points together. The rib will need stretching as you stitch to fit the base of the jacket, so sew small amounts at a time.
5 Match and sew the width of the cuff ends together to make a tube. Fold the cuff in half, matching the two raw edges of the length together. Place the cuff over the end of the sleeves, matching the seam in the cuff to the underarm seam of the sleeve. As before, the cuff will need stretching as you sew to fit the ends of the sleeves.
6 Fold the collar in half along the fold line marked on the pattern. Position the ribbed collar around the neckline of the jacket, matching the centre of the collar with the centre back neck. Clip around the neckline, making it easier to sew the collar in place.
7 Attach the right-hand side of the zip to the right-hand side of the jacket and sew in place as far as the rib. Place the zip face down on the right side of the jacket, using a zipper foot stitch close to the teeth. The teeth of the zip should be facing in towards the jacket front. Repeat the process on the left-hand side. When the garment is finished, there won’t be any stitching on the right side of the zip. Edge stitch the edges of the rib to the remainder of the zip. Ensure the waistband base edges are level.

 Sign in with Facebook
 Sign in with Google