Already a member? Click here to Login

Safety Notice: Handmade items made from this pattern may contain small parts or long cords that pose choking or strangulation risks. Not suitable for children under 3 years. Please see the full safety disclaimer at sewmag.co.uk/safety.
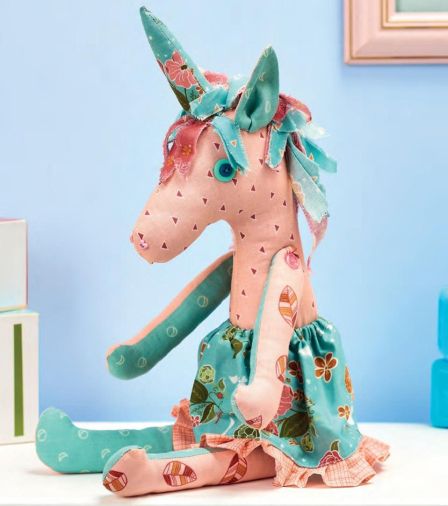
Made from an assortment of cotton in icy pastel shades, this fantastical character from Corinne Bradd is sure to put a smile on your little one’s face. What’s more, thanks to the accompanying bag, you will be able to bring along your youngster’s favourite toys, snacks and accessories whenever they set off on their big adventures. A brilliant introduction to button joints, appliqué, darts and bag making, this duo of designs is not one to be missed!
Make a tote bag
Download and print the templates from sewmag.co.uk. Cut two 11cm x 25cm pieces from three different fabrics. Sew right sides together on the long edges in an alternating pattern to make a 25cm x 62cm strip. Press and pin onto quilt wadding before topstitching down each seam. Cut out and trace the unicorn head silhouette onto the paper side of fusible appliqué sheet. Iron the sheet onto the back of contrasting fabric, cut out and peel away the backing paper. Fuse the appliqué to the centre line between two panels of the bag body and topstitch in place with a small zig zag.
Cut an 11cm x 21cm panel of fabric and sew it to the quilt wadding around all edges to make a base. Fold the bag panel in half, right sides together, and stitch the final seam to make a tube. Keeping the tube inside out, sew one long side of the base piece to the bottom edge of the appliquéd panels, right sides together. Stitch the other long side to the opposite two body panels then check the fit of the remaining short sections against each other before completing the base and turning the bag right sides out.
Create a bag lining in the same way as the outer from a 25cm x 62cm panel of fabric and a base, 11cm x 21cm, leaving a 10cm gap in one long seam joining the base to the body. Make two straps by folding in 1cm on the long edges of 7cm x 50cm strips. Fold the strips in half to match up the hems and topstitch. Tack the straps to the top edge of the bag outer, matching the raw edges. Slip the lining over the outer so right sides are facing and sew all around the top, adding extra stitches to where the handles are tacked.
Turn the bag out through the gap in the lining and push out the corners. Fold in the raw edges of the gap and topstitch closed. Push the lining into the bag and topstitch around the top of the bag to neaten. Cut narrow strips of fabric and fray before sewing to the applique at the front of the bag as a mane. Sew small buttons to the appliqué to represent an eye and nostril.
Sew a unicorn toy
Trace the body piece onto the reverse of right sides together fabric, adding a 5mm seam allowance all round. Stitch the darts at the top and bottom of each body piece before sewing them right sides together, leaving a 5cm gap along the back of the neck. Clip the curves, turn out, and stuff firmly before folding in the edges of the gap and slip-stitching closed.
Place two different fabrics right sides together and trace arm and leg pattern pieces onto the reverse, flipping the template to make mirrored pairs. Cut out adding a 5mm seam allowance and sew together leaving a 3cm gap in the upper back of each limb. Clip the curves, turn out, and stuff before closing the gap with a slipstitch.
Pin the limbs to the body and secure them with button joints using a double thickness of thread and coordinating buttons. Sew more buttons to either side of the face and nose to create eyes and nostrils. Cut out horn pieces and stitch right sides together leaving the flat bottom edge open. Fold up and glue the bottom 5mm before turning out and stuffing. Pin the hemmed edge to the top of the head and oversew all the way round, adding more stuffing if necessary, before closing the seam.
Cut two pairs of ears from different fabrics and stitch right sides together, leaving the bottom flat edge open. Turn out, turn in the raw edges and press. Make a pleat in the bottom edge of each ear and oversew to either side of the head just behind the horn.

 Sign in with Facebook
 Sign in with Google