Sewing Pattern
Art Gallery Fabrics Upholstered Chair
Home makes
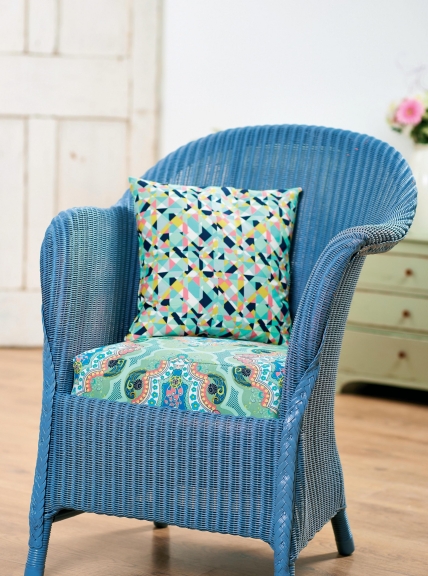
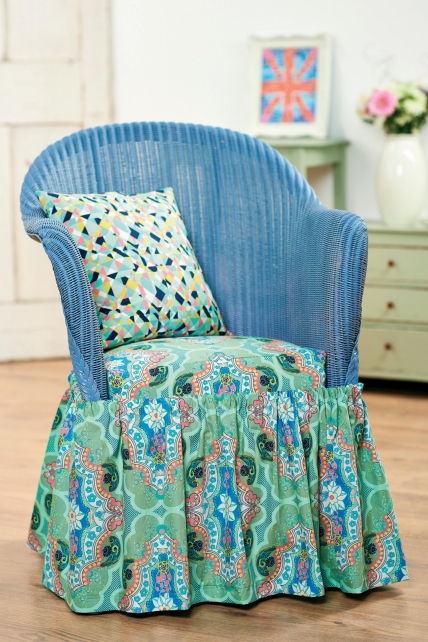
We had this old pink Lloyd Loom chair kicking around the Sew office and we thought it needed an update, so we asked Sew designer Amanda Walker to work her magic. She totally transformed it using spray paint to turn it a slate blue then used Art Gallery Fabric’s new Carnaby Street range by Pat Bravo to cover the chair. She also created a removable frill so you can decide if you want a modern or vintage look.
Essentials
- Lloyd Loom chair
- Fabric: Art Gallery Fabrics, Carnaby Street range, Go Go London Powdery, 1m, Brit Boutique Radiant, 3m; plain for lining
- Spray paint, Rustoleum: primer; Painter’s Touch Slate Blue
- Cushion pad, 40cm square
- Elastic, 2.5cm wide
- Staple gun
- Hammer
- Pliers
Dimensions List
- Custom sized
Makeover a chair
Take out the upholstered seat and remove the old cover, extracting the tacks and staples. If the chair has never been painted before or has a very bright existing colour, it is recommended that a primer is used first. Wash the surface of the chair thoroughly, leave to dry, then apply the primer. Leave to dry overnight then apply the top colour, following the manufacturer’s instructions. Leave for a further 24 hours.
Cut out the top part of the upholstered cover. Draw around the wooden and metal seat frame onto a piece of lining fabric. Add 1.5cm seam allowance to the edge and cut out the piece. Use this as a template to cut out the patterned fabric; treat these two pieces as one now. Cut a strip of lining and fabric to the circumference of the seat top, plus 3cm (you may need to join fabric to achieve this) and the width of the springs and wadding plus an extra 5cm; this will become the side of the seat cover.
Next, attach the side with the right side of the strip and the the top seat pieces facing. Stitch together starting at the corner of one of the straight front edges of the cover. When the side has been attached, stitch the two ends together and turn the cover to the right side.
Place the cover over the seat, making sure that all the seam allowances are pointing down. Pull the sides of the cover onto the wooden bars of the base and use a staple gun to stretch and position a staple in the centre front and then on the opposite side at the back, followed by the sides. Continue stretching and stapling around the edge. Keep checking the top of the seat to make sure that it is forming an even shape.
Create a skirt
Measure around the chair then double the number; this will become the circumference of the skirt. Next, calculate the depth of the skirt and add 3cm for the hem and 4cm for the channel which will accommodate the elastic.
Join the widths of fabric together to achieve the circumference needed for skirt. Attach them in a circle then fold and press up the 3cm for the hem and either hand stitch or machine stitch in place.
Fold and press 1cm around the top of the skirt and then another 3cm. Edge-stitch the channel in place, leaving a gap in the stitching line. Thread elastic through the channel with a safety pin. The amount of elastic needed is approximately half the circumference of the chair. Sew the two ends together then complete the stitching line in the channel.
Make a cushion cover
To cover a 40cm square cushion pad you will need to cut a rectangle of fabric measuring 40cm x 2.75 times this measurement (1.1m). Overlock or zig zag stitch both of the narrow ends of the rectangle. At one of these ends fold and press a 5cm flap onto the wrong side of the fabric.
With the right side of the rectangle facing you, fold the neatened ends in towards each other, the edge with the extra fold first, and then cross them over in the centre until the folded rectangle measures 2cm smaller than the cushion pad (38cm), forming an envelope opening. Pin these folds in place before stitching 1cm seams to both the open raw edges. Overlock or zig zag the two seams. Turn the cover to the right side and press.


