Sewing Pattern
Sweetcorn Veggie Felt Toys
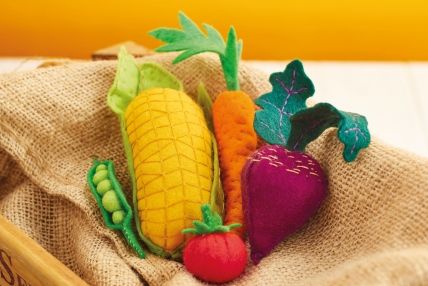
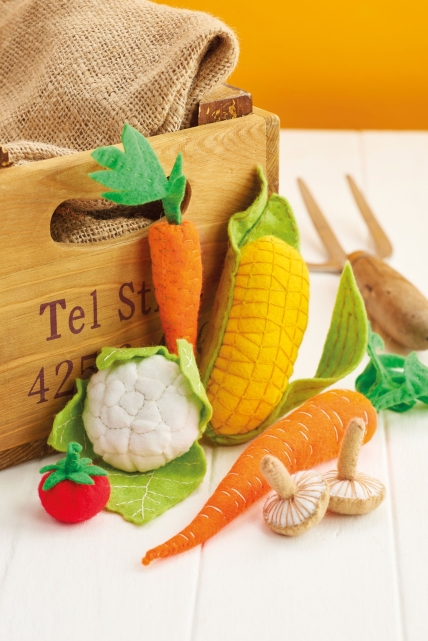
Children love to play shops or pretend to cook, so this greengrocer’s selection of vegetables (with the odd fruit too!) will be top of their shopping lists. These felt creations - including a sweetcorn, beetroot, carrot, peas and tomatoes - are realistic enough to make your mouth water, but still easy to sew using our templates. Simple embroidery and running stitches are all you need to create a quality finish.
Essentials
- Felt, assorted colours
- Embroidery thread, assorted colours
- Toy filling
- Fabric glue
Prepare the templates
Download and print the templates. Cut the templates from thin card and draw around them onto the wrong side of the felt with a soft pencil in a colour close to the material, then cut out without adding any seam allowance. Alternatively, trace the designs onto paper and either very lighter glue, or staple to the felt. Keep the template in place while cutting around the edges then remove the paper.
Sweetcorn
Cut the sweetcorn template from golden yellow felt. On one half of the shape use two strands of ochre embroidery thread to sew a series of parallel long stitches up the shape, approximately 1cm apart. Stitch across the shape, matching up the ends of the stitches and allowing the creation of triangular ‘kernels’ in some places. Fold the sweetcorn in half and oversew around the seams leaving a gap in the bottom. Firmly stuff to round out the cob and close up the gap. Cut leaves from bright green felt. Place the largest over the back of the cob and secure with running stitches, leaving the top of the leaf unattached and gathering the bottom to fit the base of the cob. Add veining to the leaf with long running stitches. Add veins to the remaining leaves before stitching them on either side of the first leaf to enclose the undecorated back of the cob. Allow one of the leaves to curl down for a realistic look.
Carrot
Use the template to cut a small, medium, or large triangle from orange felt. Fold in half and oversew the back seam with two strands of orange thread. Use a knitting needle to push small tufts of filling into the end of the carrot, bit by bit to avoid lumpiness. Continue to fill the carrot to the top before sewing a small running stitch around the top of the cone and pulling tight to gather. Fasten off and push a knitting needle through the hole at the top to ensure there is a small gap for inserting the leaves. Starting at the tip of the carrot, use two strands of cream thread to stitch a series of long and short stitches around the shape to create the root ridges, starting and fastening by stitching a couple of backstitches close to the back seam and running the tail of the thread through the vegetable before trimming. Cut leaf shapes from green felt, fold in half and sew running stitch up the stem until you reach the feathery leaf parts. Run stitches up the centres of the leaves and gather very slightly before fastening off to gently shape the leaves. Apply a little fabric glue to the hole in the top of the carrot and push the stems of the leaves into this with a knitting needle. Alternatively, insert the leaves and secure with a few small stitches.
Beetroot
Cut three beetroot templates from purple felt and oversew together into a triangular cone, leaving a small gap at the top of each section. Stuff the shape, then sew running stitch around the gap, and gather to leave a small hole for inserting the leaves. Use two strands of pale orange thread to sew a series of long and short running stitches around the top third of the beetroot to represent the root pattern. Cut leaves from dark green felt and add veining lines with two strands of purple embroidery thread. Apply a little fabric glue into the hole at the top of the beetroot and push the leaves into this with a knitting needle. Alternatively, secure the leaves with small stitches.
Tomato
Cut a circle of red felt using the template and sew running stitch around the circumference with two strands of red embroidery thread. Gather up the stitches to form a bowl, then firmly stuff before tightening the gather and fastening off. Cut a sepal shape from mid green felt and clip a small hole in the centre. Glue this over the gathered top of the tomato and push a knitting needle through this into the shape to make a gap. Cut a rectangle of green felt, roll up and oversew the edge to make a stalk. Apply a little glue into the hole at the top of the tomato and push the end of the stalk into this, securing with a few stitches if necessary.
Peas
Cut two small and three larger circles of bright green felt using the template. With each circle, gather the edges with a small running stitch, add a little toy filling, then tighten and secure the stitches to make a ball.
Mushroom
Cut a small circle of white felt and a larger one from light brown. Oversew one to the other, gathering the larger one slightly with each stitch to match the circumference of the smaller one to form a domed top. Stuff the mushroom before sewing up completely. Use two strands of light brown embroidery thread to sew gill markings from the centre of the white side, out to the edges. Avoid pulling the thread too taut as this will distort the shape. Cut a rectangle for the stalk from light brown felt and fold in half. Oversew the side seam and gather around one end. Stuff and secure the open top end of the stalk to the centre of the mushroom’s underside with small stitches.
Cauliflower
Cut two circles of white felt using the templates. Sew irregular rings of small, taut running stitches over the the surface of the larger circle to create the floret pattern of the cauliflower. Oversew the large circle to the smaller one, gathering the edge of the patterned top with each stitch to match the circumference of the base. Firmly stuff the shape before closing the seam completely. Cut several leaves from bright green felt and secure to the base so they surround the vegetable. Use running stitch to create a veining pattern on each one, passing the stitching through the stuffed shape as you sew the bottom parts of the leaves so they enclose the base.


